


Spring Chocolate Bark
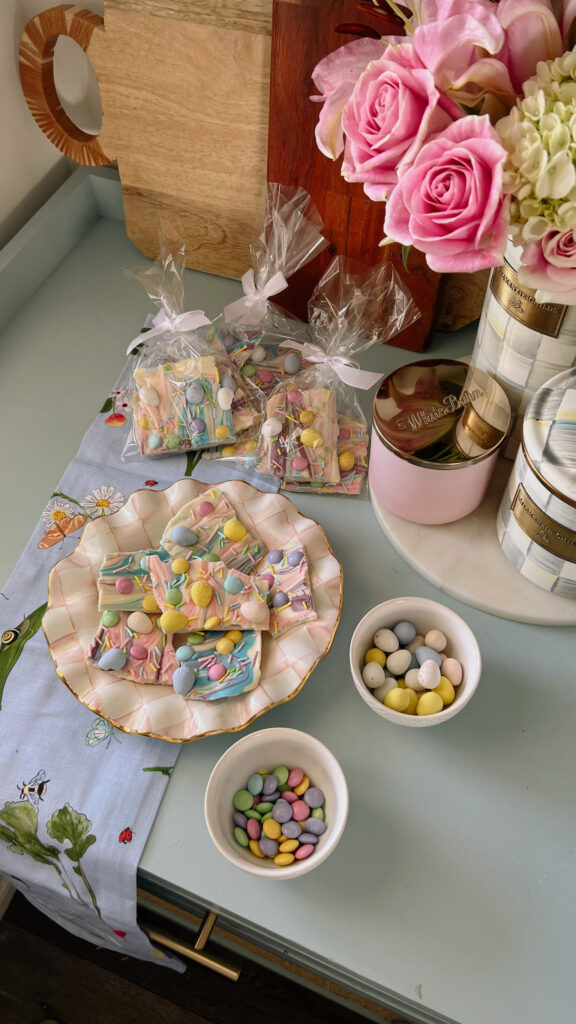
My friends and family have been loving my seasonal chocolate bark recipes, so with Easter coming up, I knew I wanted a spring candy bark to share with my loved ones. Easter and spring call for pastel colors, mini eggs, and sprinkles! Once my treat was all done, I put it in bags to share with all of my favorite people.


My friends and family have been loving my seasonal chocolate bark recipes, so with Easter coming up, I knew I wanted a spring candy bark to share with my loved ones. Easter and spring call for pastel colors, mini eggs, and sprinkles! Once my treat was all done, I put it in bags to share with all of my favorite people.
What Is Spring Chocolate Bark?
I’ve been making festive bark and fruit bark for a few months now if you’d like to see my other recipes!

Easter Candy Bark Recipe

Ingredients
- White chocolate
- Pink candy melts
- Purple candy melts
- Blue candy melts
- Mini eggs
- Pastel M&M’s
- Sprinkles
Shop ingredients:


Everything Else You’ll Need:


Instructions
Step One
Pre-heat the oven to the lowest temperature it will go – around 120-170 F. Place wax paper on a baking sheet.


Step Two
Place chocolate bars on the prepared sheet. Bake for about 5 minutes.
Step Three
Melt the pink candy melts, purple candy melts, and blue candy melts in separately bowls in the microwave for 30 second intervals, stirring in between. Plop the pink evenly onto the melted white chocolate.
Shop Candy Melts:


Step Four
Once everything is melted, plop the pink, blue and purple evenly onto the melted white chocolate.
Step Five
Using a cookie stick, swirl the chocolates together.
You’ll want to avoid over mixing because it’ll just turn into one color versus swirls.


Step Six
Sprinkle the chocolate with pastel M&M’s and mini eggs (or whatever toppings you’ve chosen). Finish with the sprinkles
Allow the chocolate to harden at room temperature for a couple of hours – or overnight. You can put it in the fridge for an hour to make it harden quicker, but keeping it in the fridge for too long may lead the candy to condensate and ruining the color.
Shop Toppings:
Step Seven
Gently remove the chocolate from the pan by lifting the wax paper edges. Place on a cutting board and cut into whatever sized square you like. You can also just break it up with your hands instead of a knife.
Shop the equipments & tools used:


Step Eight
If you’re giving this Easter chocolate bark out as gifts, I recommend using cellophane bags and twist tie bows to make it special!
Shop bags & bows:

People You Can Give Spring Candy Bark To:
- Friends
- Family
- Neighbors
- Co-workers
- Delivery drivers
- Your children’s teachers
- House cleaners
- Front desk & maintenance employees (at your apartment building or workplace)
Printable Recipe

Spring Chocolate Bark
Ingredients
- White chocolate
- Pink candy melts
- Purple candy melts
- Blue candy melts
- Mini eggs
- Pastel M&M’s
- Sprinkles
Instructions
- Pre-heat the oven to the lowest temperature it will go – around 120-170 F. Place wax paper on a baking sheet.
- Place chocolate bars on the prepared sheet. Bake for about 5 minutes.
- Melt the pink candy melts, purple candy melts, and blue candy melts in separately bowls in the microwave for 30 second intervals, stirring in between. Plop the pink evenly onto the melted white chocolate.
- Once everything is melted, plop the pink, blue and purple evenly onto the melted white chocolate.
- Using a cookie stick, swirl the chocolates together. You'll want to avoid over mixing because it'll just turn into one color versus swirls.
- Sprinkle the chocolate with M&M’s and mini eggs (or whatever toppings you’ve chosen). Finish with the sprinkles.
- Allow the chocolate to harden at room temperature for a couple of hours – or overnight. You can put it in the fridge for an hour to make it harden quicker, but keeping it in the fridge for too long may lead the candy to condensate and ruining the color.
- Gently remove the chocolate from the pan by lifting the wax paper edges. Place on a cutting board and cut into whatever sized square you like. You can also just break it up with your hands instead of a knife.
- If you’re giving this Easter chocolate bark out as gifts, I recommend using cellophane bags and twist tie bows to make it special!
You might also like