


Chocolate Bark Recipes For Every Occasion
Explore a variety of festive chocolate bark recipes perfect for every holiday and celebration. From Christmas to Valentine’s Day, get creative with these easy, fun, and delicious chocolate bark ideas!


Chocolate bark is not only super easy to make but also so fun and versatile! You can use whatever ingredients you want and make such a delicious treat for all of the various festive occasions. Festive chocolate bark is such a fun treat to have at celebrations and gift-giving. You can tie them up in little cellophane bags for your friends and family. I have so many chocolate bark recipes to share, so I hope at least one inspires you today.
What Is Chocolate Bark?
Chocolate bark is a delicious and easy treat that you can make by simply melting chocolate bars on a baking sheet and top off with candy, pretzels, sprinkles and more. It’s so popular because of how easy and simple it is to make! This treat is also super easy to clean up afterwards if you use the parchment paper and baking sheet method. You don’t need too many ingredients to make this recipe and you can use whatever chocolate you like – dark, milk or white!


Fruit Chocolate Bark Recipe
Strawberry Chocolate Bark
Ingredients:
- Fresh strawberries
- Your choice of chocolate (dark, milk, or white)
- Peanut butter
Equipment:
- Cookie sticks or straws for swirling
- Cookie sheet/rimmed baking sheet
- Parchment paper/wax paper
Instructions:
- Preheat the oven to it’s lowest temperature, my oven goes to 170 F degrees.
- Prepare baking sheet by placing parchment paper on it.
- Wash & cut your strawberries into your preferred size. Using this fruit chopping tool makes it easier and faster to get the perfect size cut every time
- Line your baking sheet with 4-6 chocolate bars and place in the oven for about 5-7 minutes.
- Once the chocolate is melted enough, take the chocolate out of the oven and swirl it together using a cookie stick.
- Add lots of strawberries to your chocolate before it begins to harden.
- Place a spoonful or two of peanut butter in a ziplock bag & cut a small corner off (a smaller hole makes a thinner drizzle). Drizzle the peanut butter across the chocolate sheet.
- Freeze for 20 minutes (or until peanut butter hardens).
- Remove the baking sheet from the freezer. Lift the chocolate fruit bark out of the baking sheet by lifting the edges of the parchment paper. Place it on the cutting board, parchment paper facing down.
- Cut into squares – size is up to your preference.

Shop All of the Ingredients and Equipment:


Pomegranate Chocolate Bark
Ingredients:
- 2 milk chocolate bars
- 2 white chocolate bars
- 1 pomegranate (or 1 pomegranate cup)
Equipment:
- Cookie sticks or straws for swirling
- Cookie sheet/rimmed baking sheet
- Parchment paper/wax paper
Instructions:
- Pre-heat oven to 170 F degrees and put parchment paper on a baking sheet.
- Lay chocolate bars flat. Bake for 5-8 minutes depending on the thickness of the bar (the same brand of chocolate used throughout works the best!)
- Swirl the chocolate bars together with a cookie stick until you can no longer see any of the original lines from the bars.
- Gently press the fruit into the chocolate to avoid them falling out when you cut the bark.
- Place the sheet into the fridge for at least 2 hours.
- Cut into squares and store in the refrigerator.

Shop All of the Ingredients and Equipment:


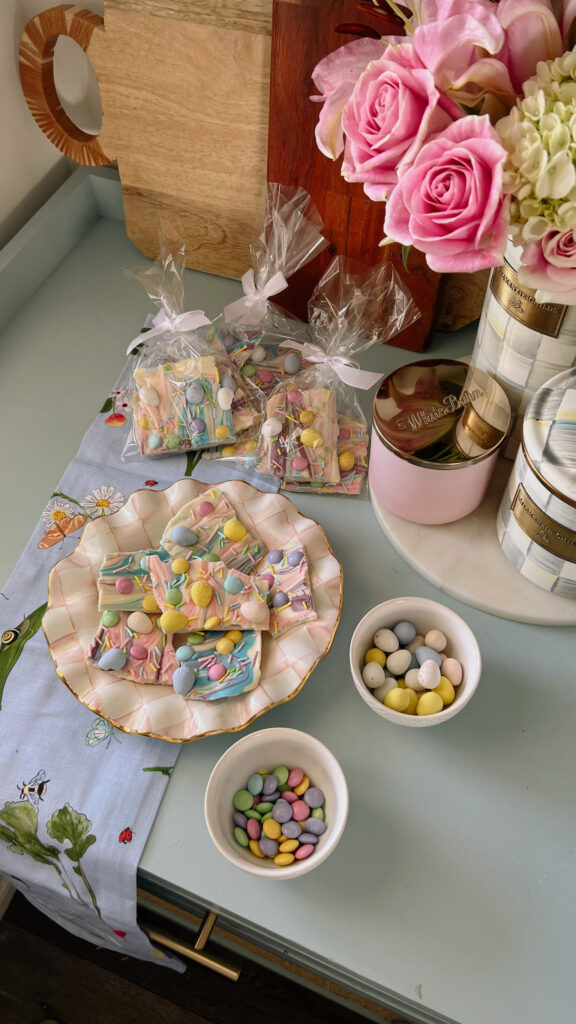
Bunny Bark Recipe
I made spring chocolate bark and it turned out so cute! Pastels and chocolate eggs made for the perfect Easter chocolate bark and I loved how it turned out.

Ingredients:
Toppings:
You can add more toppings too, such as pretzels, white chocolate chips, edible bunny charms, etc.
Instructions:
- Pre-heat the oven to the lowest temperature it will go – around 120-170 F. Place wax paper on a baking sheet.
- Place chocolate bars on the prepared sheet. Bake for about 5 minutes.
- Melt the pink candy melts, purple candy melts, and blue candy melts in separately bowls in the microwave for 30 second intervals, stirring in between. Plop the pink evenly onto the melted white chocolate.
- Once everything is melted, plop the pink, blue and purple evenly onto the melted white chocolate.
- Using a cookie stick, swirl the chocolates together. You’ll want to avoid over mixing because it’ll just turn into one color versus swirls.
- Sprinkle the chocolate with pastel M&M’s and mini eggs (or whatever toppings you’ve chosen). Finish with the sprinkles.
- Allow the chocolate to harden at room temperature for a couple of hours – or overnight.
- Break up the chocolate bark once it’s fully hardened.
- If you’re giving this Easter chocolate bark out as gifts, I recommend using cellophane bags and twist tie bows to make it special!
*You’ll want to avoid putting it in the fridge because the candy will condensate and ruin the color. Also, if you use pretzels, they’ll become chewy in the fridge.
Shop All of the Ingredients and Equipment:


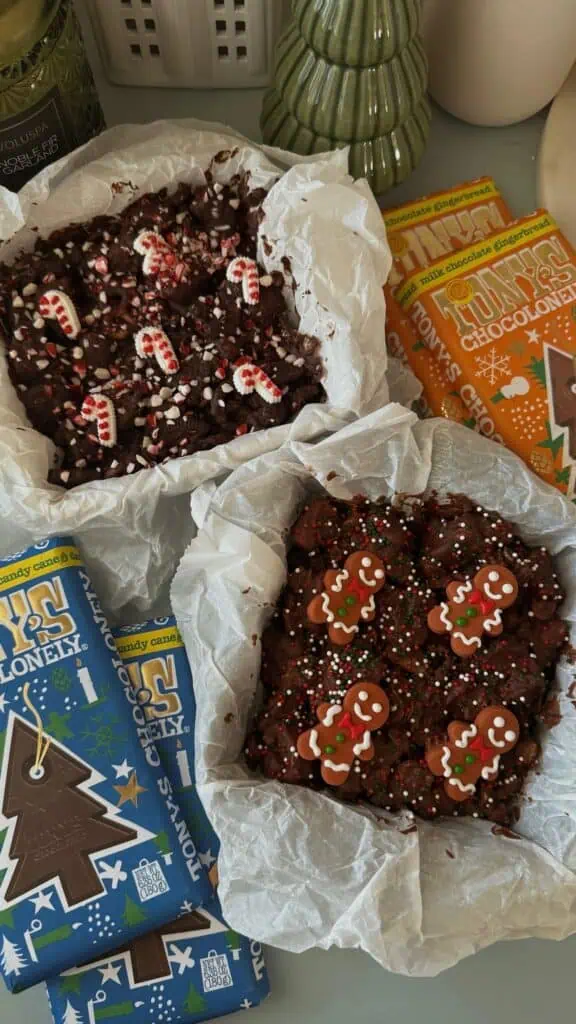
Christmas Chocolate Bark Recipe
I made holiday chocolate bark last Christmas and it was so festive and fun! It turned out to be the perfect chocolate bark for parties.

Ingredients:
Toppings:
- Holiday M&M’s
- White chocolate chips
- Red & green mini pearl sprinkles
- Crushed peppermint candies or crushed candy canes
- Gingerbread sprinkles
- Tiny pretzels
- Santa sprinkles
Instructions:
- Line a baking sheet with parchment paper and place 6 chocolate bars (white chocolate, semi sweet chocolate, and milk chocolate) in a flat, even layer.
- Bake for 8-10 minutes on the center rack of the oven at 120 F degrees.
- Swirl the chocolate bars together with a cookie stick until you can no longer see any of the original lines from the bars.
- Decorate the bark.
- Let it harden at room temperature.
- Break the bark into pieces & enjoy!

*You’ll want to avoid putting it in the fridge because the candy will condensate and ruin the color. Also, if you use pretzels, they’ll become chewy in the fridge.
Shop All of the Ingredients and Equipment:


Valentine’s Day Candy Bark Recipe
I made pink and white Valentine’s day chocolate bark and it turned out sooo cute and yummy!! I put them in adorable cellophane bags with a bow twist tie to give to my friends and it was the cutest chocolate bark for gifts.

Instructions:
- Pre-heat the oven to the lowest temperature it will go – around 120-170 F. Place wax paper on a baking sheet.
- Place chocolate bars on the prepared sheet. Bake for about 5 minutes.
- Melt pink candy melts separately in a bowl in the microwave for 30 second intervals, stirring in between. Plop the pink evenly onto the melted white chocolate.
- Using a cookie stick, swirl the chocolates together. You’ll want to avoid over mixing because it’ll just turn into one color versus swirls.
- Sprinkle the chocolate with M&M’s and mini pretzels (or whatever toppings you’ve chosen).
- Lightly toss sprinkles over the toppings and then allow the chocolate to harden at room temperature for a couple of hours – or overnight.
- Break or cut the bark into your preferred size.

*You’ll want to avoid putting it in the fridge because the candy will condensate and ruin the color. Also, if you use pretzels, they’ll become chewy in the fridge.
Shop All of the Ingredients and Equipment:


More Desserts
These unique chocolate bark flavors are all so much fun to create and I hope you enjoy trying a recipe or two! If you choose to make one of these, tag me so I can see your fun take on them. And be sure to let me know what bark recipe is your favorite! Stay tuned for more bark recipes throughout the year, here on my blog, Instagram, TikTok, etc. Because I have so many more chocolate bark recipes to come.
Holiday Rocky Road
These easy Christmas treats are so fun to make because they’re a customizable dessert. This no-bake treat is also so perfect for holiday gatherings or for gifting in little bags (after you cut them up)!
Peppermint Sugar Cookie Bars
Incorporating holiday flavors to your favorite desserts can make them more fun and festive and topping the classic sugar cookie bars with a delicious hint of peppermint is a quick and easy way to create a holiday-themed dessert. I love pink during the holidays, and this recipe is so girly but also perfect for the winter season.


S’mores Dip
This 3-ingredient treat is so perfect for a cozy fall night! I recently had a movie night to watch the original “Beetlejuice” movie and fall snacks were a must. This s’mores dip was so easy!
High Protein Homemade Ice Cream
I’m so excited about my new Ninja Creami! You can make endless flavors of ice cream – and you can make it as healthy as you want! I decided to experiment a little and two of my favorites so far are key lime pie fro-yo and chocolate peanut butter ice cream!

Printable Recipes

Chocolate Strawberry Clusters
Equipment
- baking sheet
- Parchment paper
- Cookie sticks
Ingredients
- Strawberries
- White chocolate
- Dark chocolate
- Peanut butter
Instructions
- Preheat the oven to it’s lowest temperature, my oven goes to 170 F degrees.
- Prepare baking sheet by placing parchment paper on it.
- Wash your strawberries by soaking them in a solution of cold water and a small amount of baking soda or vinegar. Then rinse them thoroughly with cold water, and pat them dry to ensure the chocolate will stick.
- Cut them into your preferred size. Using a fruit chopping tool makes it easier and faster.
- Line your baking sheet with 4-6 chocolate bars and place in the oven for about 5-7 minutes.
- You can use any chocolate flavor but I used half dark and half white because it makes for a very pretty end product when you swirl them together.
- Any chocolate brand works but using the same brand for all of the bars will melt the best due to being the same size.
- Once the chocolate is melted enough, take the chocolate out of the oven and swirl it together.
- This step is really only necessary if you did different chocolate flavors (such as white and dark). But make sure you don’t over-mix the two colors because it’ll just become one.
- Add lots of strawberries to your chocolate before it begins to harden.
- I try to fill the entire area with strawberries and then press then down slightly to avoid them falling out later on. I leave a little space between the strawberries to show the chocolate!
- Place a spoonful or two of peanut butter in a ziplock bag & cut a small corner off (a smaller hole makes a thinner drizzle).
- Drizzle the peanut butter across the chocolate sheet.
- Freeze for 20 minutes (or until peanut butter hardens).
- Remove the baking sheet from the freezer. Lift the chocolate fruit bark out of the baking sheet by lifting the edges of the parchment paper. Place it on the cutting board, parchment paper facing down.
- Cut into squares – size is up to your preference.
Notes
Essential Ingredients
- Fresh strawberries
- Your choice of chocolate (dark, milk, or white)
Optional Add-ins and Toppings
- Peanut butter
- Salt
- Bananas
- Chopped nuts
- Sprinkles
- Orange or lemon zest
Proper Storage Methods
Storing chocolate strawberry clusters is really easy! I store them in an airtight container in the freezer so the peanut butter remains hardened. You can do the fridge if it’s just chocolate and strawberries, however, the freezer is preferred.How Long Do They Last?
In the fridge, these chocolate treats should last 4-5 days. But much longer in the freezer! You can always make a few batches and store in the freezer since it lasts so much longer.
Fruit Bark
Equipment
- Cookie sheet/rimmed baking sheet
- Parchment paper/wax paper
- Cookie sticks or straws for swirling
Ingredients
- 2 milk chocolate bars
- 2 white chocolate bars
- 1 pomegranate or 1 pomegranate cup
Instructions
- Pre-heat oven to 170 F degrees and put parchment paper on a baking sheet.
- Lay chocolate bars flat. Bake for 5-8 minutes depending on the thickness of the bar (the same brand of chocolate used throughout works the best!)
- Swirl the chocolate bars together with a cookie stick until you can no longer see any of the original lines from the bars.
- Gently press the fruit into the chocolate to avoid them falling out when you cut the bark.
- Place the sheet into the fridge for at least 2 hours.
- Cut into squares and store in the refrigerator.
Notes

Spring Chocolate Bark
Ingredients
- White chocolate
- Pink candy melts
- Purple candy melts
- Blue candy melts
- Mini eggs
- Pastel M&M’s
- Sprinkles
Instructions
- Pre-heat the oven to the lowest temperature it will go – around 120-170 F. Place wax paper on a baking sheet.
- Place chocolate bars on the prepared sheet. Bake for about 5 minutes.
- Melt the pink candy melts, purple candy melts, and blue candy melts in separately bowls in the microwave for 30 second intervals, stirring in between. Plop the pink evenly onto the melted white chocolate.
- Once everything is melted, plop the pink, blue and purple evenly onto the melted white chocolate.
- Using a cookie stick, swirl the chocolates together. You'll want to avoid over mixing because it'll just turn into one color versus swirls.
- Sprinkle the chocolate with M&M’s and mini eggs (or whatever toppings you’ve chosen). Finish with the sprinkles.
- Allow the chocolate to harden at room temperature for a couple of hours – or overnight. You can put it in the fridge for an hour to make it harden quicker, but keeping it in the fridge for too long may lead the candy to condensate and ruining the color.
- Gently remove the chocolate from the pan by lifting the wax paper edges. Place on a cutting board and cut into whatever sized square you like. You can also just break it up with your hands instead of a knife.
- If you’re giving this Easter chocolate bark out as gifts, I recommend using cellophane bags and twist tie bows to make it special!

Valentine’s Day Candy Bark Recipe
Ingredients
- White chocolate
- Pink candy melts
- M&M’s Valentine’s Day mix
- Mini pretzels
- Sprinkles
Instructions
- Pre-heat the oven to the lowest temperature it will go – around 120-170 F. Place wax paper on a baking sheet.
- Place chocolate bars on the prepared sheet. Bake for about 5 minutes.
- Melt pink candy melts separately in a bowl in the microwave for 30 second intervals, stirring in between. Plop the pink evenly onto the melted white chocolate.
- Using a cookie stick, swirl the chocolates together.
- Sprinkle the chocolate with M&M’s and mini pretzels (or whatever toppings you’ve chosen).
- Lightly toss sprinkles over the toppings and then allow the chocolate to harden at room temperature for a couple of hours – or overnight.
- Gently remove the chocolate from the pan by lifting the wax paper edges. Place on a cutting board and cut into whatever sized square you like.
- If you’re giving these out as gifts, I recommend using cellophane bags and twist tie bows to make it special!
Notes

Christmas Bark
Equipment
- cookie sheet
- Parchment paper
- Straws or sticks for swirling
Ingredients
- 2 white chocolate bars
- 2 dark chocolate bars
- 2 milk chocolate bars
- toppings of your choice
Instructions
- Preheat the oven to 120 degrees.
- Line a cookie sheet with parchment paper and place 6 chocolate bars in a flat, even layer.
- Bake for 8-10 minutes on the center rack of the oven.
- Swirl the chocolate bars together with a cookie stick until you can no longer see any of the original lines from the bars.
- Decorate the bark with whatever toppings you'd like.
- If you're in a hurry, you can freeze the bark for 30 minutes or refrigerate for an hour. Letting it harden at room temperature will prevent condensation.
- Break the bark into pieces & enjoy!
Notes
You might also like